BUTTON PATTERN
US Terms in Balck UK Terms in red Brackets
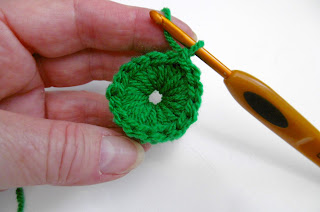
One finger wrap of 10 wraps.
ROUND1:sc [dc], into the circle 12times, sl st to complete.
ROUND 2: 40+sc [40+dc], into the circle over the top of round 1
continue until you have a dughnut for a button and continue to fill the hole for a Gem
NOTE: don't pull the stitches tight but not loose either.
NOTE: don't pull the stitches tight but not loose either.
Turn Gem over this is the side that will be on view
A doughnut for a button,
A Gem...fill the hole completely about 50-60+ sc [dc].
NOTE: How many sts you need will depend on your tension the figures are a guide, but all your button or Gems need to me made the same, so after the first one, make all buttons and Gems with the same number of sc [dc]
leave a long end for sewing
add to projects as decoration or as actual working buttons...the middle button is through a button hole in the mini bag above
Making a Gem Bezel
Three finger wrap of 8 wraps
Round 1: 32sc [32dc], into the circle sl st to complete.(32sts)
Round 2: sc [dc], in every st, sl st to complete. (32sts)
Round 3: 2sctog [2dctog], x 16 times (16sts)
Round 4:2sctg [2dctog], x 8 times (8sts)
Round 5: 2sctog [2dctog], x 4 times (4sts)
Round 6: 2sctog [2dctog], x 2 times (2sts)
cut off and leave a long end for sewing
turn the bezel inside out and reshape, pull long end through middle st,
place a Gem inside the cup bezel pulling end through the middle of the bezel,
the gem should sit snug inside the bezel,
Tie the two ends together one from the gem and one from the bezel
sew off the gem thread and use the bezel thread to join the gems in bezels
together.
Thread the long end to one side of the Gem, over stitch with small stitches the the next Gem.
Make several and sew together in a straight line for a bracelet or with a slight curve for a necklace.
LENGTHENER
Attach yarn to one bezel add a length of ch st, to fit.
Row 1: sc [dc], in every ch st sew off end securely
HAPPY HOOKING
Make a set of Gems in the colour of your choice and join together in a variety of different designs.
In a triangle of 3, in a long row long enough to make a complete necklace, or join 7, 8 or 9 Gems together for a necklace
or 5 together as a bracelet or make a statement ring with a singe Gem
This necklace is made in Merino and Alpaca


Thank you for this great tutorial. I love it!
ReplyDeletexxx Ria
Hi Ria, thank you, glad you enjoyed it xx
DeleteI wanna thank you too for sharing this beautiful tut!
ReplyDeleteAnd wish you the best time - all the time!
Sabine from Worms in Germany
Hi Sabine, thanks glad you enjoyed the post x
DeleteOh, Sue! Wonderful! I love crochet jewelry and this is some new stuff here! 👏 How DO you create an original piece so fast?! You even have more than one color scheme for those of us that do better seeing it than imagining it. I still love moss stitch, and it will be my favorite for life I'm beginning to think. I really enjoy the light neutral shade with the greens arranged in an ombre effect. It's wonderful! And.. (sorry, there's more) those moss stitch mitts! I'm working on fingerless Gloves and wristers at this present time, but honestly only crochet them in a rectangle, in sc or hdc working blo. I join them, to be worn with the rows running lengthwise down my arm. This allows for a fabric that "gives" to fit well since arms change girth from elbow, to wrist, then to hand. I am wondering about those moss stitch mitts when it comes to a fit all the way up your arm. Is it stretchy? We're they done in the round? Is there a pattern for them?
ReplyDeleteA fabulous post, and just in time for my birthday! Thursday is the big day and I think that I might stitch up one of two of your beauties just for me! Gorgeous!
Ooops! missed the one Maschelle, moss stitch is really a stretchy stitch in fact it can tighten work as you go, great for cushions when you want a firmer fabric though. Maybe the way you make yours helps with the stretch So far NO PATTERN for the mittens sorry x
DeleteLindo trabalho, aproveitei a ideia e fiz um lindo pingente para um colar lindo. Grata!!!
ReplyDeleteHi Angela, thanks wonderful, hope you enjoy wearing it and maybe make more, I would love to see a picture of it but can't find any on your blogs? x
Delete